Friday, March 15, 2013

Stage Three Delivery

Today we ship to ION the following components:

  • 5 of Head Fixture (A3024HF)
  • 1 of Implantable Lamp (A3024A)
  • 2 of White Test Lamps
  • 1 of Command Transmitter (A3023CT)
  • 1 of Booster Amplifier (ZHL-3A)
  • 1 of 24-V Power Supply for Booster Amplifier
  • 1 of Flexible Antenna with 2-dB Attenuator
  • 1 of Telescoping Antenna with BNC elbow
  • 1 of Coaxial Cable with 12-dB Attenuator

Early next week we plan to ship the following, which will complete the deliveries required by ISL Stage Three, Design and Construction of the Implantable Lamp.

  • 4 of Implantable Lamp (A3024A)

In the photograph below, we see the Command Transmitter (A3023CT) connected directly to the Flexible Antenna. The 2-dB attenuator at the base is necessary to stabilize the A3023CT's power amplifier. This arrangement supplies 100 mW of 146-MHz RF power to the antenna, and is easy to set up. We use this arrangement for test that do not require us to operate more than 50 cm from the antenna. We determine the length, number, and spacing of RF power pulses using the same control program that we use with the Lamp Controller (A2060L).


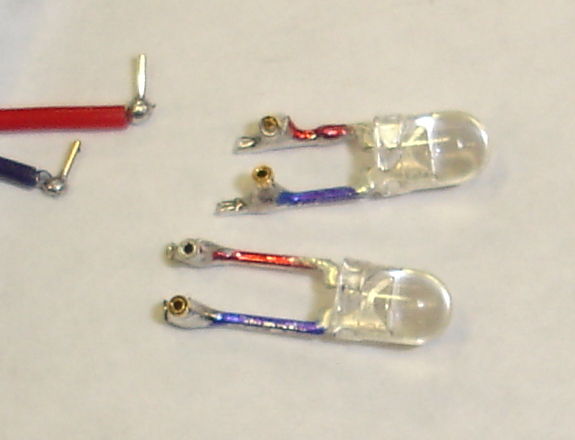
The same photograph shows one Implantable Lamp (A3024A) flashing a white LED, and another at with a paper insulator around its L+ lead. The paper insulation is needed to stop the A3024A contact pins from touching when stored in a bag. If they touch and the lamp is stimulated, we will waste battery capacity supplying current to the lead resistance. The white LED is one of our White Test Lamps, which we have equipped with sockets to accept the pins on the tips of the A3024A leads. The test lamp leads have color codes and socket orientation to mimic the head fixtures and the colors of the A3024A leads.


When we want to operate farther from the antenna, and allow for random movements of the receiver, we add a ZHL-3A booster amplifier between the A3023CT and the antenna, and we use a telescoping antenna instead of the shorter flexible antenna. The telescoping antenna is more efficient. In this arrangement, we must be sure to insert the 12-dB attenuator between the A3023CT and the ZHL-3A, so as to protect the ZHL-3A's input from over-drive. With this arrangement, we obtain 100% reliable stimulation of the implantable lamps at range 1 m in our basement laboratory and 2 m in a faraday tent. This operating range is double that which we set as our target.


The telescoping antenna, being 1 m tall, needs to be vertical or else it will fall over. The ZHL-3A amplifier gets warm after a few minutes. We have found it to be rugged, but the manufacturer recommends that you connect its load (the antenna) and input (the cable carrying 146 MHz) before you connect power (the 24 V supply) in order to protect it from over-drive.

The Head Fixtures (A3024HF) are equipped with sockets for the A3024A contact pins. They are equipped with dummy cannulas in their guide cannulas. We have applied black epoxy over the clear epoxy that holds the fiber to the LED and the circuit board to the guide cannula. The black epoxy serves to mask light that escapes through the base of the fiber, which is roughly 85% of the light emitted by the LED. By masking this light, we are better able to estimate the power emitted by the fiber tip, and we avoid flashing a bright light into the subject animal's field of view, which might otherwise corrupt our experiment. The disadvantage of our black covering of epoxy is that the experimenter may not be able to confirm by inspection whether or not the implantable lamp is responding to commands. In future designs, we will consider placing a separate LED on the back of the head fixture to emit a small amount of light as an indicator for the experimenter.


It is hard to measure the total power emitted in all directions by the fiber tapers. Nevertheless, we tried to do so and obtained 2.5±1 mW. When we tested the fibers before we tapered them, we obtained 3±0.2 mW. These results are consistent, and suggest that the total power is a little below 3 mW. This 3 mW is well below our target of 10 mW. In the future, we will increase the power output at the tip by using a higher numerical aperture fiber, or higher drive current, or a more efficient LED, or some combination of all three modifications.
Monday, March 4, 2013

Prototype Head Fixture

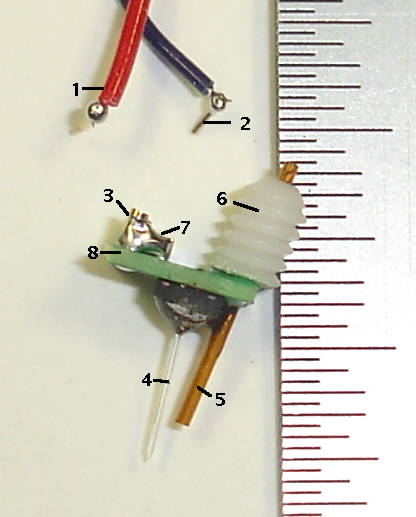
The following photograph shows our first assembled fiber and cannula Head Fixture, following the design we presented earlier. The small ruler graduations are 0.5-mm. The fiber diameter is 300 μm.


Part (4) is the fiber, one end of which is glued with clear optical epoxy to an EZ500 LED mounted on the circuit board. This fiber is a dummy we used to make a prototype head fixture. Its tip is sheared off at an angle instead of tapered with a flame.

Part (1) is the L+ lead from an Implantable Lamp (A3024A). Part (2) is the connector pin on the end of the L− lead from the same device. These pins plug into two sockets on the Head Fixture. Part (3) is the L− socket. The L+ socket is obscured by L−. Part (8) is the head fixture circuit board. Part (5) is a silica guide cannula. Part (6) is the threaded pedestal on the guide cannula. Part (7) is a smoothing capacitor to reduce noise induced in EEG recordings.

Wednesday, February 27, 2013

Measured Capture Efficiency

We have four different types of optical fiber and two different types of light-emitting diode. We make three samples of each fiber, which we name 1 to 3 for each type. Each fiber has two faces, A and B. We lower each face of each fiber onto an LED in turn and measure the power emerging from the other face.


Figure: Fraction of Power Captured By Fibers. The 480-μ square LED is the C460EZ500. The 290-μm square LED is the C470EZ290.

In the above table, we calculate the theoretical capture fraction in two steps. First, we estimate the fraction of light that will enter the fiber, based upon the area of the fiber and the area of the LED. Second, we apply our cosine-distribution solution to the capture efficiency of a fiber of known numerical aperture, which we present here.

In the case of the 400-μm fiber over the 290-μm square LED, we assume all the LED's light enters the fiber. The fiber is larger than the diagonal of the square, and placed within 50 μm of the LED surface by pressing down the bond wire. We observe 15% capture fraction and calculate 14%. Our calculation based upon the fiber numerical aperture appears to be accurate.

In the case of the 300-μm fiber over the 480-μm LED, we assume that only 30% of the light will enter the fiber. But our observed capture fraction is 9% and our calculation is 5%. Given that we already trust our numerical aperture calculation, we suspect that twice as much light is entering the fiber as we expected, which in turn means that the light emitted by the 480-μm square LED is concentrated towards the center.

When we place a 400-μm fiber with NA = 0.37, NA = 0.25, or NA = 0.24 on the 480-μm square LED, the capture fraction we measure is roughly 1.6 times the one we calculate. This result is also consistent with concentration of light towards the center of the light-emitting area.

Our 300-μ NA = 0.41 fiber's capture fraction with the 290-μm LED is 17%. With a 400-μm, NA = 0.37 fiber on the same LED we get 15%. If we assume that all the light from the LED enters both fibers, then the difference in capture fraction is consistent with our calculation due to numerical aperture. This suggests that the light emitted by the 290-μm LED is also concentrated towards the center, so that all of the light enters the 300-μm fiber.

We conclude that our numerical aperture calculation, which assumes a cosine distribution of light emission by the LED, is accurate, but our assumption of uniform distribution of light across the LED is not. The light is concentrated towards the center of the emitting area. Thus we are able to obtain almost double the capture fraction that we would with uniform light distribution.

With the 300-μm, NA = 0.41 fiber on the EZ290 we get 17% of the light emitted by the LED emerging from the tip of our fiber. If we could obtain a C470EZ290 that emitted 40 mW for 30 mA current, as specified by the data sheet, we would obtain 6.8 mW at the fiber tip. As it is, our EZ290s are producing only 17 mW at 30 mA, so we see only 3.0 mW. We do not know why our EZ290s are performing so poorly. The are emitting less than half the light we expect from the calibration sheet supplied with our samples. It may be that they have aged from exposure to air over the past year and a half since we received them. In the case of the EZ500, the LEDs produce 25 mW for 30 mA current, and we get 11% capture efficiency with our 400μm, NA = 0.37 fiber. So we obtain 2.6 mW at the fiber tip.

As things stand today, we can obtain roughly 3 mW with both the EZ290 and the EZ500, using our high numerical aperture 300-μm and 400-μm fibers respectively.

Thursday, February 14, 2013

LED Efficiency

We measure the total power emitted by a selection of LEDs. To measure optical power we use an SD445 photodiode. It's sensitivity to light of various wavelengths, in Ampere per Watt, is given in the figure below. We press the photodiode right up against the package of our LED, so that is roughly 2 mm from the light-emitting surface.


We reverse-biase the photodiode with a 9-V battery and pass the photocurrent through a 100-Ω resistor. We measure the voltage across the 100-Ω resistor with a voltmeter. We convert photocurrent into optical power using the graph above. At 470 nm we use 0.20 A/W. At 527 nm we use 0.25 A/W. We provide power to the LED through a 400-Ω, 1-W resistor. We measure the LED current with an ammeter. We obtain the following plots of output power versus current.


According to the EZ290 data sheet, the minimum power output of the blue C470EZ290-021 at 20 mA forward current should be 21 mA. According to the calibration of our sample diodes, the power should be at least 27 mW for this particular LED. But we measure only 13 mW. According to the same data sheet and calibration, the green EZ290s should produce at least 11 mW at 20 mA. But we measure only 6 mW. The EZ500 data sheet, meanwhile, specifies a minimum of 40 mW of green light at forward current 150 mA. We see 26 mW at 46 mA, which suggesets of order 85 mW at 150 mA.

Our green EZ500 emits twice as much power as we expect, but our blue and green EZ290s appear to be emitting less than half the power we expected from their calibration and specification. The blue EZ290 shown above will emit only 18 mW with a forward current of 30 mA, such as we expect to deliver with our Implantable Lamp (A2024A). Even if we obtain 25% coupling efficiency into our fiber, we will get no more than 4.5 mW out of the fiber tip.

UPDATE: [26-APR-13] We have 25 C460EZ500 (460 nm blue) mounted in 3-mm packages. We measure the light power emitted by one such part with a photodiode. We bias the photodiode with 0 V and with 9 V. The photocurrent is 6% higher with bias. The responsivity of the un-biased photodiode is roughly to 0.182 for 460-nm light and 0.191 mA/mW at 470 nm.

UPDATE: [22-JAN-14] The surface of the SD445 appears to be acrylic glass, which has reflectance with angle of incidence in air as plotted below. We obtained this and the following plot from Refractive Index Info.


The silicon of the photodiode we assume to be crystalline, which has the following reflectance with angle of incidence in air. By reflection alone, we expect to lose around 44% of incident unpolarized blue light by reflection at the acrylic and silicon boundaries for light arriving perpendicular to the surface. We calculate the sensitivity of the ideal photodiode, where one photon becomes one electron, is 0.38 mA/mW for 470 nm. If we lose 44% of incoming photons by reflection, we expect our SD445 to have sensitivity 0.21 mA/mW. The data sheet says 0.20 mA/mW.


At larger angles of incidence, we will lose more light by reflection, so the sensitivity of the photodiode will drop. At 80° we expect to lose around 60% by reflection, compared to 40% at 0°, so sensitivity will drop to 0.13 mA/mW.

Monday, January 28, 2013

Antenna Matching

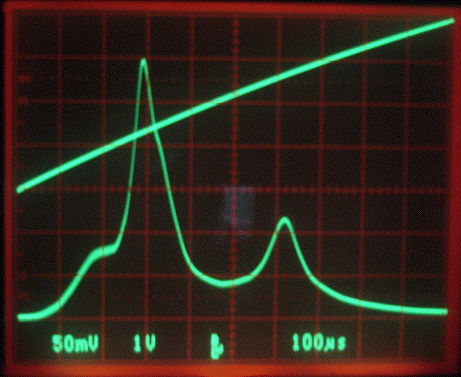
Today we try a split capacitor antenna matching circuit to see if we can amplify the RF signal on our antenna before presenting it to our detector diode. Such amplification is, in theory, possible, because the source impedance of the antenna signal is of order 100 Ω, this being the resistance of the antenna wire to 146 MHz, while the load impedance of our detector diode is of order 10 kΩ. We describe our analysis and testing of the split-capacitor network in detail here. The following oscilloscope trace shows the dual resonance of the matching circuit we built.


Here we see the detector diode output as a function of frequency when we have a two-loop stainless steel antenna picking up power from a nearby transmitter. The top trace is a frequency sweep voltage. The bottom trace is the detector diode output. The first peak is at 146 MHz and corresponds to a gain of 20 generated by the split capacitor tuning network. Thus the signal applied to our detector diode is twenty times larger in amplitude than the signal on our antenna. The second peak is at 170 MHz and corresponds to the resonance of the antenna inductance with our split capacitor.

We equip an Implantable Lamp (A3024) with the split capacitor circuit and test its reception when transmitting pulses of 146 MHz power at 1.6 W into a half-wave antenna. We find that reception is 100% up to range 3 m, and remains 50% at 14 m. The matching network has increased the effective range of our command receiver by a factor of six. We can now expect 100% reliable reception within a faraday enclosure at up to 1.5 m, which will be sufficient to communicate with the ISL.

Thursday, January 24, 2013

Faraday Canopy

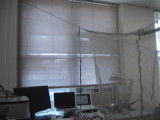
We tried out our new FE3A faraday canopy today. The photograph below shows the canopy hanging from the walls of our office. Inside you can see an implantable lamp flashing in response to power transmitted by a half-wave antenna.


The walls and ceiling are made of a transparent veil fabric woven from thin wire. The base is a layer of absorbent sheet on top of reflecting foil. For a better idea of the size and shape of the canopy, we invite you to watch the following video.


The implantable lamp is an A3024Y, which has no tuning capacitor or inductor, and is therefore sensitive to all RF frequencies. The white lamp flashes when it is within a few centimeters of our 2.4 GHz wireless router. Inside the the canopy, however, it never turns on unless we stimulate it with our own RF power. We transmit 146-MHz with a half-wave, telescoping antenna driven by a Command Transmitter (A3023CT) with booster amplifier. The booster amplifier delivers 1.6 W to the antenna and is only 10% efficient, so its black heat-sink vanes get hot to the touch.

We hold the A3024Y between thumb and forefinger and move it at random 30 cm from the transmitting antenna. We obtain 100% reliable reception. We move to range 50 cm and obtain 95% reliable reception. If we hold the A3024Y in our hand, enclosing its two-loop receiving antenna, reception at 30 cm drops to 95% and at 50 cm drops to around 80%. We expect that reception from an implanted A3034Y would be somewhere in between these two tests.

We measure the isolation provided by the canopy enclosure with respect to external interference in the 900-930 MHz range, this being the range used by our SCT system. We are hoping to find that interference power drops by a factor of one hundred within the enclosure, but instead we observe a factor of ten or twenty. For more details and discussion see here.

We are gratified to find that the ISL command transmission works just as well inside the enclosure as outside. We will work on improving the isolation the enclosure offers at the SCT data frequency. We might, for example, try adding a layer of absorber to the ceiling.

Tuesday, January 22, 2013

Implantable Lamp Encapsulation

Here is our first encapsulated Implantable Lamp (A3024Y), equipped with a BR1225 battery with capacity 48 mA-hr. This device is equipped with a white LED rather than an implantable head fixture.


The volume of the main body of the device is roughly 1.7 ml. The volume of the Subcutaneous Transmitter (A3019A), meanwhile, is 1.3 ml, and that of the Subcutaneous Transmitter (A3019D) is 2.4 ml. The former is tolerated by mice and the latter by rats. Our hope is that we can implant our 1.7-ml Implantable Lamp along with a 1.3-ml Subcutaneous Transmitter in a rat to monitor EEG and apply optical stimulus.

The A3024Y's 146-MHz command antenna is 30 mm in diameter compared to only 20 mm in diameter for the A3019A and A3019D 915-MHz data antenna. We do not know how well any animal will tolerate the larger antenna.

We move the A3024Y around at random near our 1.6-W source of 146-MHz radio-frequency power. At range 50 cm, the lamp flashes in roughly 95% of orientations. We are hoping for over 98% reliability at range 50 cm. We should be able to increase the reliability of reception by improving the tuning circuit and by increasing the power of our radio-frequency transmission.