
Figure: Cross-Section of Insulating Collar. The water film around the silicone leads is interrupted by the insulating collar. The dental cement binds directly to the collar.
We try heat shrink tubing as a collar. The smallest diameter we have is 2.5 mm on the outside before we shrink it, and roughly 0.7 mm on the inside after we shrink it. Our lamp leads are 0.9-1.2 mm in diameter. When we shrink the tubing onto one of these leads, we can slide the collar up and down the lead afterwards by stretching the lead so as to reduce its diameter. We need a narrower diameter tubing or we need a way to glue the tubing to the silicone. Setting that problem aside for now, we put some tubing in dental cement to see if we get good wetting of the plastic surface by the cement.

Figure: Adherence of Dental Cement (Acrylic) to Heat Shrink Tubing.
When we try to pull the tubing out of the cement, it breaks at the top surface of the glue, leaving the rest inside. We put collars on two silicone leads. The leads have bare spring terminations. We glue the collars into dental cement, as shown below. Because of the collars, the two leads become separated by a layer of dental cement, which surrounds the collars by capillary action of the acrylic. Resistance between the two leads is >40 MΩ.

Figure: Collars Glued Into Dental Cement.
When the cement has hardened, we put the cup and leads in water at 60°C for half an hour, to allow water to penetrate wherever it can by capillary action. Resistance is >40 MΩ. We put the beaker on our bench and measure the resistance as time goes by. Fifty minutes after first contact with water, the wires are still insulated from one another. We add salt. Resistance between two pins 1 cm apart is now less than 1 kΩ. With the cement still in salt water, we hold it in place and pull on the two leads one hundred times. Insulation is intact. After another ten minutes, insulation is still intact.
We pull the silicone off our epoxy-sealed head fixture. We cut back the lamp leads on D7.7 and attach another set of pins. We add a collar to each lead, connect the pins to the head fixture, and encapsulate in dental cement. Once the cement is hardened, we break the cement out of its red plastic cup. We immerse in hot water, see here. We pull on the lamp leads 100 times. Lamp artifact with 100% brightness is a few hundred microvolts, and consistent with no conduction between the lamp leads and the EEG leads. We put the ISL with head fixture, and the two-wire apparatus, in saltwater for the weekend.
UPDATE: [22-DEC-15] After four days in saltwater, we see 100-mV artifact when flashing the head fixture. The resistance between each wire and the surrounding water is around 5 MΩ. The resistance between the blue wire and the water is >40 MΩ, but between the red wire and the water is only 10 MΩ. We use Loctite Super-Glue Gel to glue single 3-mm long collars on two blue wires, and triple 1-mm long collars on two red wires.
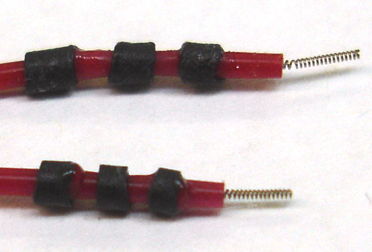
Figure: Triple Collars. Each collar is glued to the silicone with super-glue gel. Modelled after the triple o-ring seals we see in pacemaker connections.
Once the gel has cured, we can no longer slide the collars along the silicone. We embed the collars and wire tips in dental cement. When cured, we immerse in saltwater and arrange the free ends of the wires so we can measure easily the resistance between each wire and the water. We stretch all four leads by 15% one hundred times each while they are wet with saltwater. This stretching is within the elastic limit of the springs. We leave them for one hour. We combine a 10-V power supply with our 10-MΩ millivoltmeter to make an instrument capable of measuring resistance up to 100 GΩ. The water connection resistance is 20 GΩ for the two triple-collar red wires and >100 GΩ for the single-collar blue wires.
UPDATE: [24-DEC-15] Water connection resistances today are 100 GΩ, >100 GΩ, >100 GΩ, and >100 GΩ for red left, red right, blue left, and blue right. We connect the two red wires to D7.7's lamp power, with a blue LED in parallel. The blue LED flashes. We lower the ISL into a beaker of water with the cement fixture. We see 500 μV artifact. We do the same with the two blue wires, but connect no LED. We obtain 500 μV artifact. We pull 100 times on each of the two blue leads, stretching them by 30% each time while they are wet with saltwater. This stretching is at the elastic limit of the springs. We put the cement fixtures back in the saltwater with the ISL and observe the full-scale artifact below.

Figure: Artifact After Breaking Single-Collar Seals with 5-N Tugging. This display is centered with 65536 range, when it should be simply displayed with the same range. In simple display we see the entire waveform, in this display we are missing the tops of the artifact.
We have broken the seal. We do the same with the pair of triple-collar red wires, applying a force sufficient to stretch them by 30%, tugging 100 times. When we are done, the wires curl up because we have deformed the springs. We put the fixture back in the water and observe the same full-scale artifact. We smash open the cement fixtures. The collars are held firmly in the cement. But the wires now slide freely through the collars. The super-glue seal is broken. The leads are narrower because they have been elongated. They are no longer in compression where they pass through the collar.
The triple-collar performed no better than the single-collar. Once the super-glue seal breaks, the seal cannot recover. We would rather make a seal by compressing the silicone so forcefully that the lead cannot slide through the collar, even if we pull on it with sufficient force to stretch it by 30%. We have ordered narrower tubing and will try it when it arrives.
In the meantime, we are curious about the resistance of the shrink tubing and super-glue seal to saltwater. We assemble two single-collar seals. We measure their water contact resistance to be >100 GΩ. We put them in saltwater and set them in our oven to poach at 60°C.
UPDATE: [30-DEC-15] The two leads we left in saltwater at 60°C still provide isolation >100 GΩ. On day four of the six-day poach, we took the leads out and pulled on them one hundred times, stretching them by 15% each time. Isolation remains >100 GΩ.
UPDATE: [05-JAN-15] We have heat shrink tubing SFTW-203 in 1/16" size. Outer diameter is 2.0 mm before heating, 1.5 mm after. Inner diameter 1.5 mm before heating, 0.50 mm after. A 10.8-mm length is 10.1 mm after heating. We take a 100-mm long, 1-mm diameter silicone-insulated helical steel lead. We cut a 3-mm length of tubing and slide it onto the lead. We stretch the lead by 20 mm so its diameter reduces to around 0.8 mm, but the spring does not deform. We shrink the tubing and allow it to cool for ten seconds. We can slide the collar along the wire easily if when the wire is stretched by 20%, but the collar grips the wire when we relax the spring. We hold the 3-mm tube in one hand and the far end of the lead in the other. We pull on the collar. When the lead has stretched by 17%, the collar starts to move. We slide the collar back into place and repeat several times, obtaining similar results. We try a 10-mm collar. The spring extends by 28% before the collar slips.
We glue a 3-mm collar to the silicone lead with 3M's Vetbond. The glue does not appear to bond the silicone to the collar. We try Loctite Ultragel, allowing ten minutes to cure. We pull on the collar until the lead has extended by 33%, by which point the lead has deformed. The collar is still fixed in place. We try MED10-6607 dispersion as an adhesive. We wait one hour for it to cure and find that the collar appears to be lubricated by the silicone, which has not yet cured.
We apply 3-mm collars to two leads. We glue them in place with Ultragel. We have 3 mm of silicone insulation between the collar and the 2-mm exposed helix of steel. We encapsulate with dental cement. Keeping the cement fixture in water, we measure the resistance between the leads as we flex the leads 100 times, extending them by roughly 15% with each flex. Resistance is still >100 GΩ between each lead and the water.
CONCLUSION: It looks like a 3-mm length of the 1/16" SFTW-203 tubing with Loctite Ultragel glue provides a reliable seal against water penetration. We recommend that all four ISL leads be equipped with these collars.
No comments:
Post a Comment